FaceLandmarks.com - ARKit Face Mesh Vertex Tool
How to Setup ARKit Face Tracking in XCode
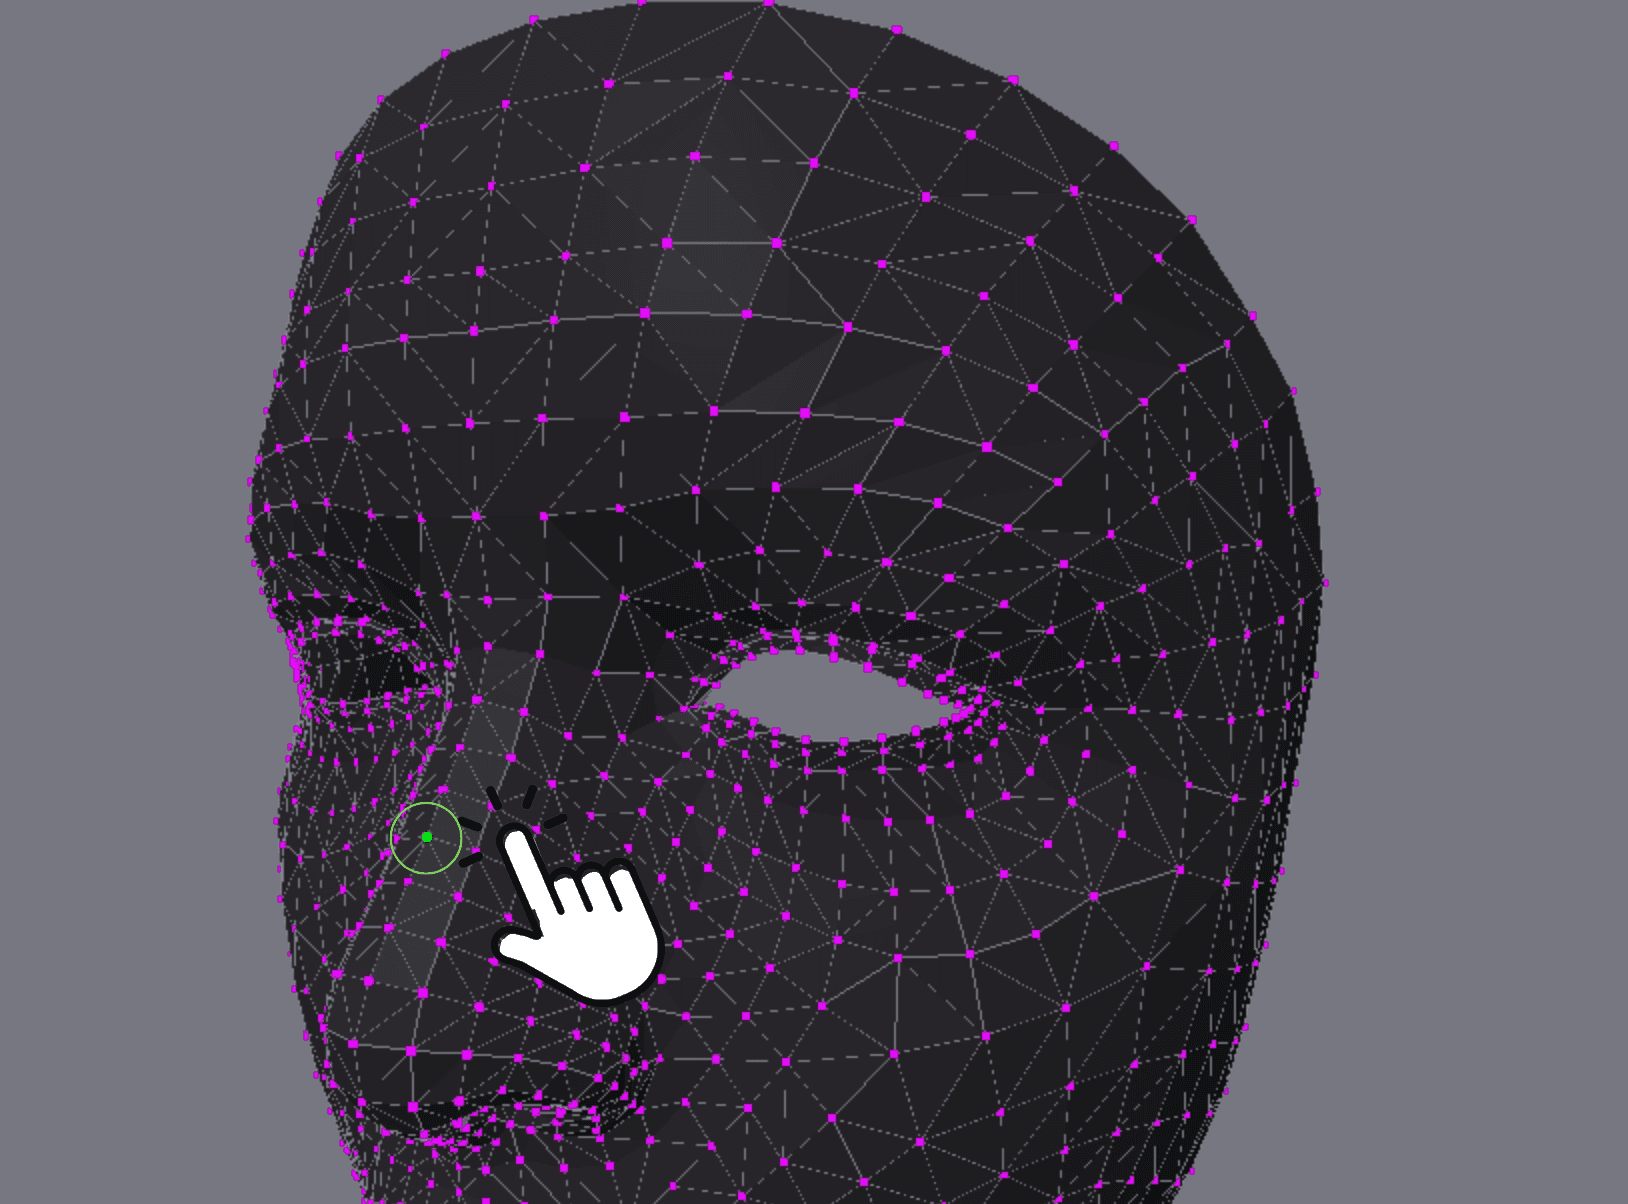
May 18, 2024 by Ryan Chiang
Hello friends,
Today I have a short tutorial on how to setup face tracking using Apple's ARKit.
What is ARKit?
For those not familiar, ARKit is an SDK which harnesses iOS, iPadOS, and VisionOS augmented reality capabilities.
Since the release of iOS 11 and the A9 processor in 2017, all iPhones (i.e. iPhones 6s and newer) support advanced face tracking capabilities.
How does ARKit Face Tracking Work?
ARKit face tracking uses a face mesh.
This face mesh is accessible through the ARFaceGeometry, ARFaceAnchor, and ARSCNFaceGeometry classes within ARKit.
What's notable about the face mesh is that it consists of exactly 1,220 vertices.
Each vertex is mapped to a specific point on the face. These vertex indices never change.
For example, a vertex with the index 0 (the 0th of the 1,220 vertices) will always map to the middle, center of the upper lip.
What is FaceLandmarks?
As an iOS, iPadOS, or VisionOS developer working with ARKit, you probably have been frustrated by the lack of documentation of these 1,220 mysterious face mesh vertices.
Apple only provides a very limited set of specific landmarks (like "leftEye" and "innerLips") in their documentation.
To solve this problem, I've created FaceLandmarks.com.
With FaceLandmarks, developers can use a 3D model directly in the browser to easily identify specific facial landmarks that map to the 1,220 vertices of ARKit's face mesh.
This makes identifying the specific vertices you need a smooth and easy process.
Need to know the exact vertex on the lefthand corner of the lips? No problem.
Or what about a random vertex in the middle of the cheekbone? Just click on it and get its exact index.
How to Setup ARKit Face Tracking in XCode
Now let's jump into the meat of this tutorial and setup our very own augmented reality face tracking app using XCode.
Before we start, I'll assume you have basic Swift knowledge and XCode installed and setup.
1. Create an augmented reality project
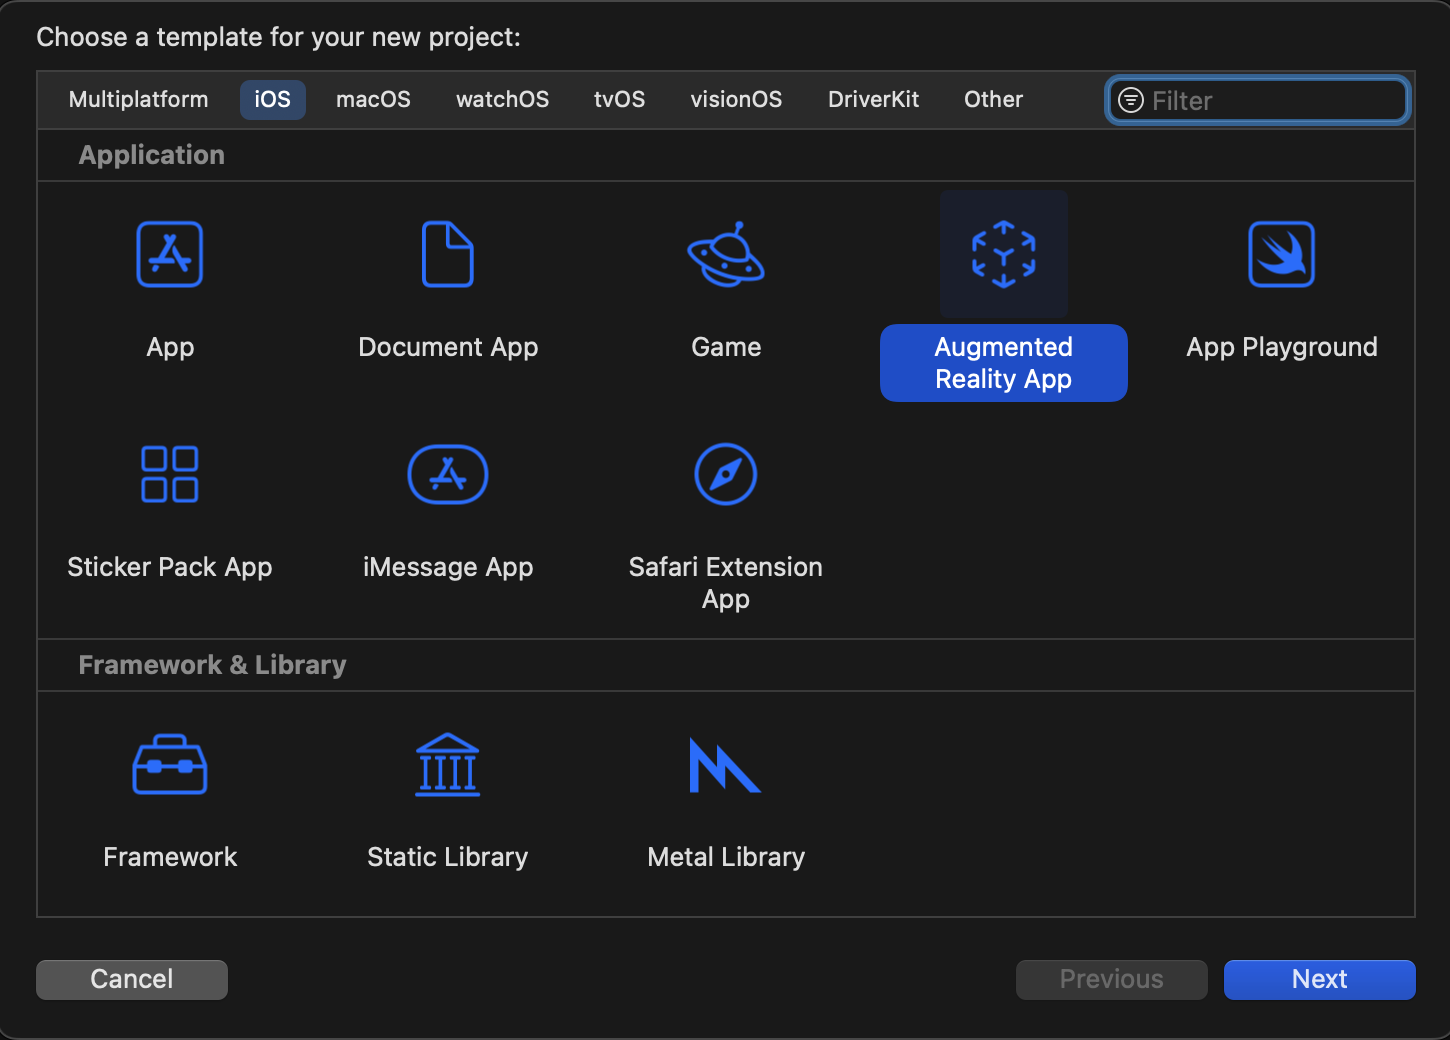
Create a new XCode project and choose the "Augmented Reality App" template:
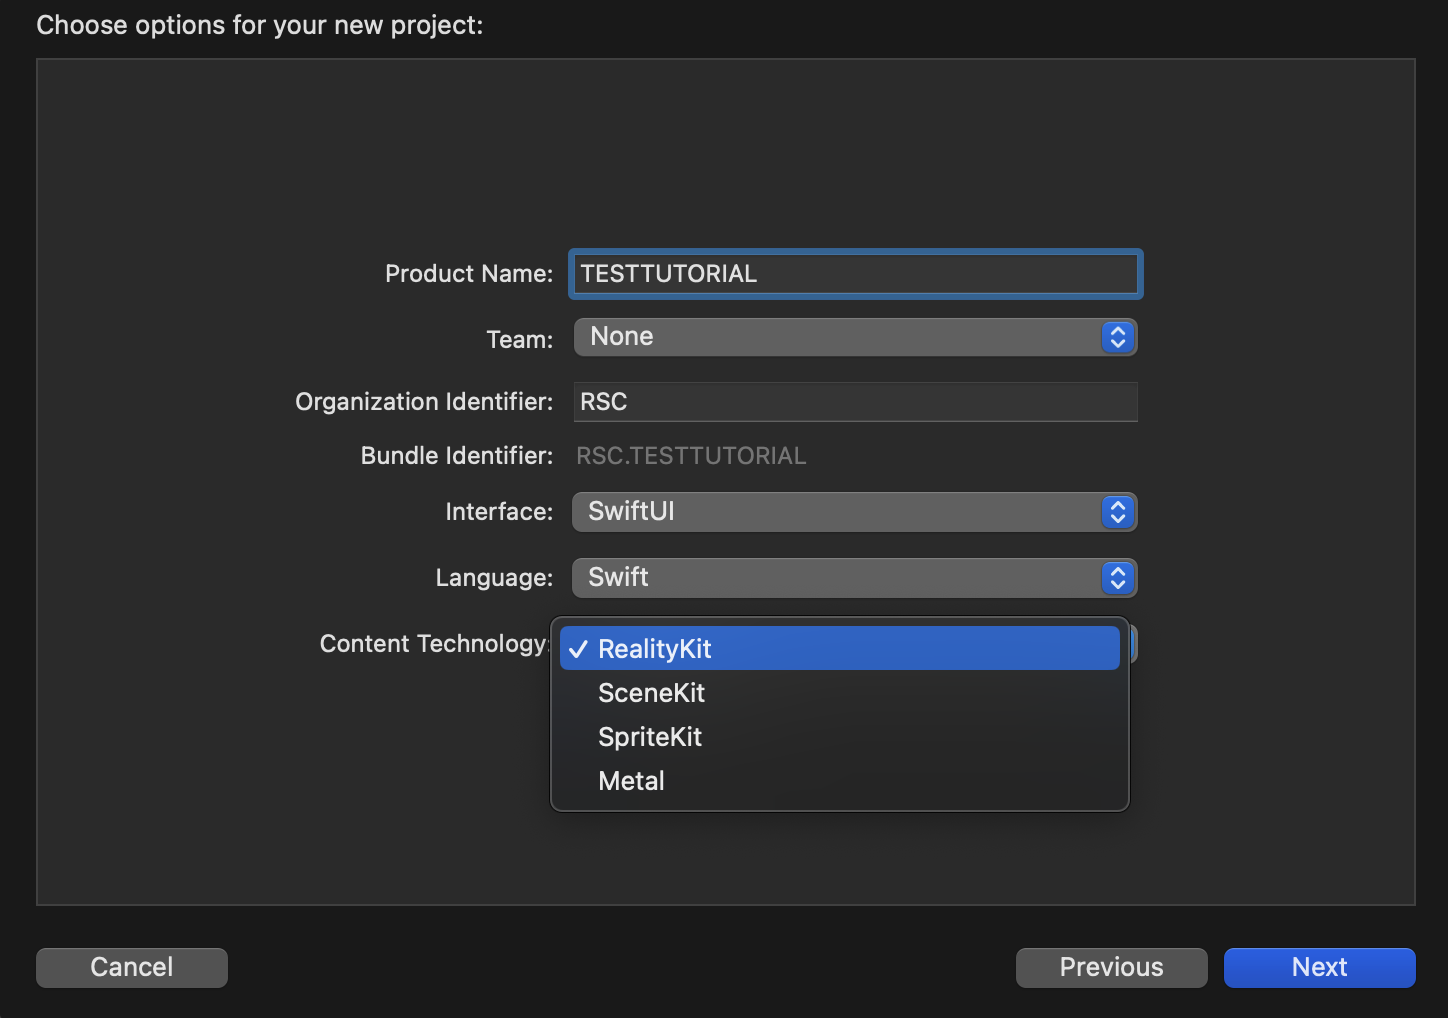
When configuring your project setup, I will be using "Reality Kit" for the content technology option and SwiftUI interface.
2. Configure Signing & Capabilities
Before we get started, we need to assign a development team in order to work with ARKit and access the device's camera.
Navigate to your project and go to the "Signing & Capabilities" tab. Use the dropdown to assign a team:

3. Make UI View and Setup ARSCNView
We'll be focused on the default ContentView file. If you open it up, you'll notice that the Augmented Reality App template has ARViewContainer struct that generates a cube, anchors it to a horizontal plane, and adds it to the scene.
Let's modify the makeUIView method like so:
func makeUIView(context: Context) -> ARSCNView {
    let sceneView = ARSCNView(frame: .zero)

    guard ARFaceTrackingConfiguration.isSupported else { fatalError() }
    sceneView.delegate = context.coordinator

    let configuration = ARFaceTrackingConfiguration()
    sceneView.session.run(configuration)

    return sceneView
}
Notice how we are returning an ARSCNView instead of an ARView.
While we chose the RealityKit template, we'll use ARSCNView which integrates SceneKit with ARKit.
The reason for this is because we want to access the ARSCNFaceGeometry class, which provides a convenient way to create a 3D face mesh that we can render.
We could alternatively use ARFaceGeometry, which also represents the geometry of a detected face (including vertex positions and triangle indices).
ARFaceGeometry is a more generic representation of the face geometry, not tied specifically to SceneKit, so you could render the face mesh using any rendering framework of choice.
If you decide to use RealityKit or Metal for rendering, for example, you would use MTLMesh and MeshResource, respectively, for creating a custom 3D mesh.
But for simplicity, using SceneKit makes rendering the 3D face mesh easier than RealityKit or Metal.
4. Make Coordinator Delegate
We'll similarly modify updateUIView to utilize ARSCNView instead of ARView like so:
func updateUIView(_ uiView: ARSCNView, context: Context) {}Next, we need to define our Coordinator class, which will let us access renderer(_:nodeFor:) and renderer(_:didUpdate:for:) methods.
Simply put, the Coordinator class acts as a delegate for the ASCNView and handles rendering and updating the AR content. It is responsible for managing the AR session and responding to changes when detecting faces.
First, we use the makeCoordinator method:
func makeCoordinator() -> Coordinator {
    Coordinator()
}
Now in our makeUIView, when we set sceneView.delegate = context.coordinator, SwiftUI will create and assign an instance of the Coordinator class as the delegate for ARSCNView (sceneView).
Next, let's define the Coordinator class like so:
class Coordinator: NSObject, ARSCNViewDelegate {
    func renderer(_ renderer: SCNSceneRenderer, nodeFor anchor: ARAnchor) -> SCNNode? {
        guard let device = renderer.device else {
            return nil
        }
        guard let faceAnchor = anchor as? ARFaceAnchor else {
            return nil
        }

        let faceGeometry = ARSCNFaceGeometry(device: device)
        let node = SCNNode(geometry: faceGeometry)

        node.geometry?.firstMaterial?.fillMode = .lines

        return node
    }

    func renderer(_ renderer: SCNSceneRenderer, didUpdate node: SCNNode, for anchor: ARAnchor) {
        guard let faceAnchor = anchor as? ARFaceAnchor,
                let faceGeometry = node.geometry as? ARSCNFaceGeometry
        else {
            return
        }

        faceGeometry.update(from: faceAnchor.geometry)
    }
}
We need our Coordinator class to conform to ARSCNViewDelegate protocol in order to receive callbacks from the AR session.
The first renderer method is called by the AR session when a new anchor is detected, which in our case is a face anchor (ARFaceAnchor).
We are creating an ARSCNFaceGeometry object and creating a SCNNode with the face geometry.
We set the node's geometry material to .lines to render the face mesh as a wireframe.
The second renderer method is called when an existing anchor (face anchor) is updated.
In this method, we simply retrieve ARFaceAnchor and ARSCNFaceGeometry from the updated node (SCNNode) and update the face geometry with the latest data from the face anchor.
This ensures that the rendered face mesh stays in sync with the detected face as it updates in real-time.
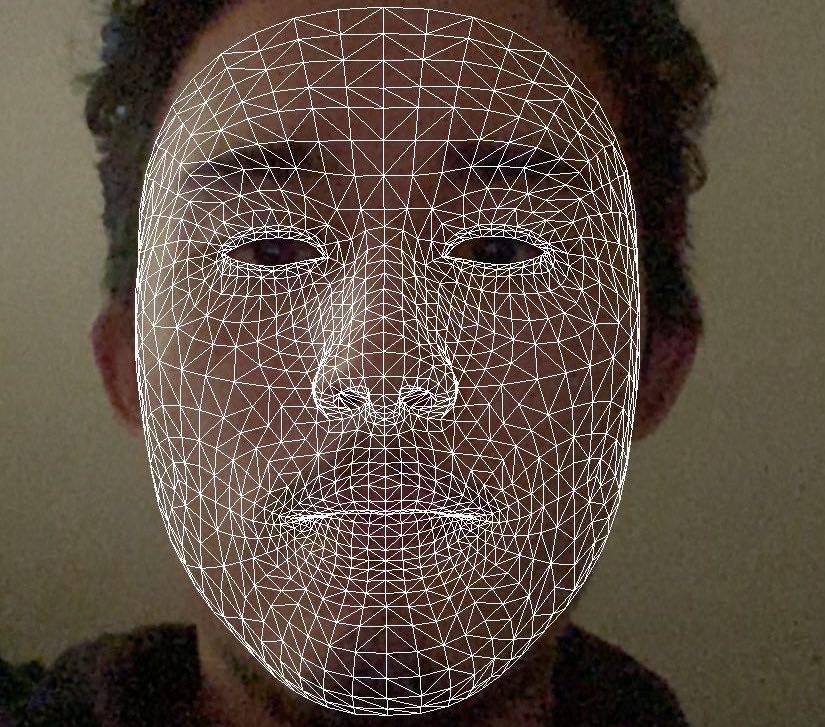
If you run the app on your device, you should successfully see the rendered face mesh!
5. Attach Nodes to Face Landmarks
We have now successfully detected a face using ARKit, and rendered a 3D face mesh.
But now you may want to use this face mesh to identify specific points on the face.
This is where FaceLandmarks come into play. As I mentioned earlier, the face geometry (ARFaceGeometry and ARSCNFaceGeometry) contains vertex positions and triangle indices.
There are 1,220 vertices and 6,912 triangle indices. We can access the vertices and triangle indices like so:
swiftlet vertices = faceAnchor.geometry.vertices // .count = 1,220
let triangleIndices = faceAnchor.geometry.triangleIndices // .count = 6,912Simply put, the vertices are... well, vertices of the face mesh. The triangle indices represent the triangular divisions you can see in the rendered face mesh.
The triangle indices define the connectivity between vertices.
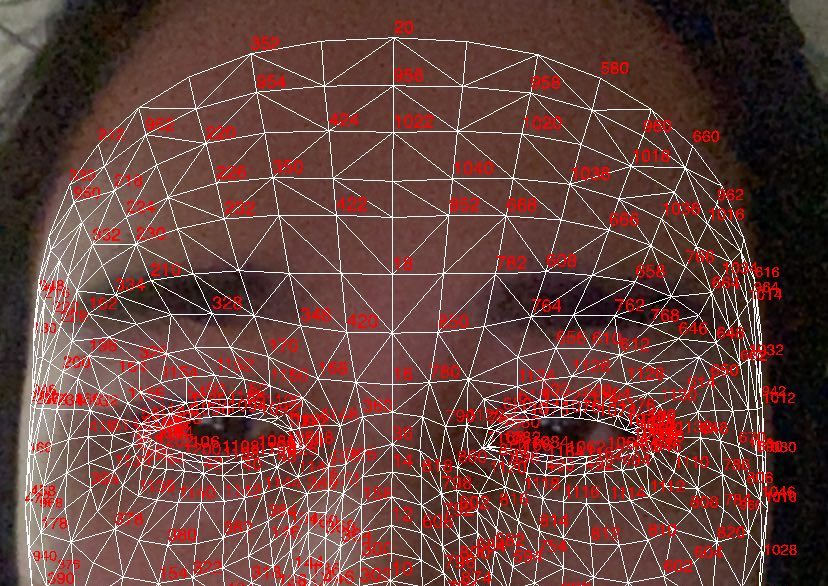
Let's render the vertex indices onto our 3D face mesh so you can see this in action. In the first renderer method, add:
func renderer(_ renderer: SCNSceneRenderer, nodeFor anchor: ARAnchor) -> SCNNode? {
    // same as before

    for x in 0..<faceAnchor.geometry.vertices.count {
        if x % 2 == 0 {
            let text = SCNText(string: "\(x)", extrusionDepth: 1)
            let textNode = SCNNode(geometry: text)
            textNode.scale = SCNVector3(x: 0.00025, y: 0.00025, z: 0.00025)
            textNode.name = "\(x)"

            // Set the text color to red
            textNode.geometry?.firstMaterial?.diffuse.contents = UIColor.red

            // Position the text node at the corresponding vertex
            let vertex = SCNVector3(faceAnchor.geometry.vertices[x])
            textNode.position = vertex

            node.addChildNode(textNode)
        }
    }

    return node
}
Here were are creating textNodes for even-numbered vertices. We position the node at the corresponding vertex position and add it to our main SCNNode (node).
Remember that we also need to update our second renderer method to handle updates in the detected face:
func renderer(_ renderer: SCNSceneRenderer, didUpdate node: SCNNode, for anchor: ARAnchor) {
    // same as before

    for x in 0..<faceAnchor.geometry.vertices.count {
        if x % 2 == 0 {
            let textNode = node.childNode(withName: "\(x)", recursively: false)
            let vertex = SCNVector3(faceAnchor.geometry.vertices[x])
            textNode?.position = vertex
        }
    }
}
Now if you build and run the app, you should see the text nodes attached to the face mesh, like so:
Wrapping Up
Hopefully now you can see how powerful ARKit is for tracking faces and you know how to setup ARKit, render a 3D face mesh using SceneKit, and attach nodes to specific face geometry vertices.
Using FaceLandmarks you can easily identify specific vertices to attach nodes or track parts of the face.
If you have any questions, feel free to reach out via the form on the homepage.
Also, I've created a repo with the full code for this project which you can find here.
Thank you for reading and I hope this short tutorial has helped you get started with ARKit Face Tracking.